Tuesday, October 2, 2012

Very Merry Christmas Ornament Tutorial: Part 2

Alright, who's ready to finish off their ornament from Part 1Smiley from millan.netThen let's get started!


This is what we've finished so far.
Just set this aside for now and we'll create the center embellishments.


1.  Take the two 12" strips of cardstock and begin accordian folding them both.


2.  You should end up with nice, tight accordians.


3.  Take your favorite adhesive and attach one end of the White Daisy strip to the other,
overlapping the edges, to create a ring.


4.  Gather one edge of the ring towards the center and push down, creating a rosette.
Take the 2" White Daisy circle and cover it with Liquid Glass.
Attach this to the center of the rosette.
(It doesn't have to be exactly centered.  This just makes a base for the rosette to attach to.)


5.  Use a block or some other object to set on top of the rosette as it dries.


6.  When it has dried, use the Silver Glitz Glitter Gel to edge the rosette.  Let it dry.


7.  Take the Twilight strip and repeat steps 3 & 4, except instead of attaching it to a circle base,
place Liquid Glass on the White Daisy rosette and place the Twilight rosette on top, fitting it in the folds, as shown in the photo.  Place theblock on top and let dry.


8.  Add more Silver Glitz to the edge of the Twilight rosette.


9. Did you know you can color embroidery floss with our alcohol markers?  Take a long string of floss, 7"-10" (whatever your fingers will be comfortable tying in a bow) and color with the Twilight marker.  Use the blending marker to smooth out the color if you wish.


10.  I forgot to take step by step photos of this next embellishment...sorry.
  • Stamp the "A Holiday Treat" image from the stamp set onto the Shift/Accent 4 White Daisy cut out.
  • Edge the 1" White Daisy circle with Silver Glitz.  Attach to stamped image with 3-D foam tape.
  • Add Sparkles to the stamped image as shown.
  • Thread the Twilight floss through a large Bling button and attach to the circle with a Glue Dot.


11.  Now you should have all 3 main pieces as shown.


12.  Take the 1" x 3" White Daisy piece and fold along the score lines.
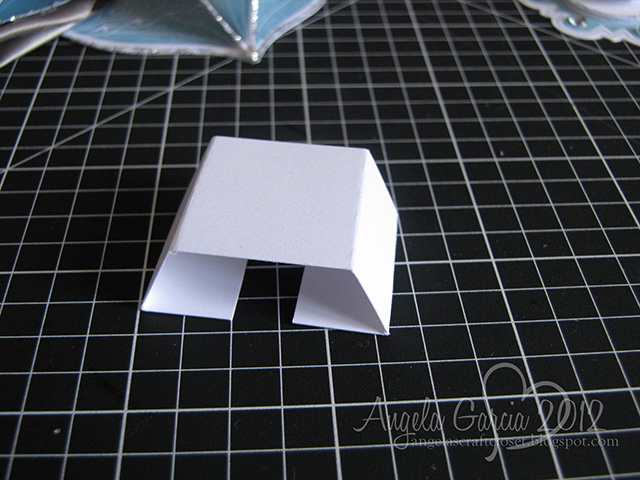


13.  This creates a base for the rosette to attach to.


14.  Use Liquid Glass to attach it to the center of the ornament base.


15.  Use Liquid Glass to attach the rosette to the ornament base.


16. Use Liquid Glass to attach the center embellishment to the rosette.
Now your ornament is complete!


17.  For the hanger, take the 16" ribbon piece and, using Glue Dots, fold over the ends as shown.


18.  Flip the ornament over.  Note where the top of it is before you attach the ribbon.


19.  Attach the ends of the ribbon with Glue Dots.


20.  Cover the back with Liquid Glass and the remaining 3" circle.


21. Flip it right side up again.  Make sure your ribbon is nice and flat.


22.  With White Daisy embroidery floss, thread a small Bling Button and tie around the ribbon hanger, just above the ornament.
 
There!  You're finished! Smiley from millan.net


Engineer had a good idea.  He wanted me to make two and attach them back to back.  And I may do this, just for fun...but after I've had a nap!
Smiley from millan.net

If you create one of these for yourself, please let me know! I'd love to see it!


Very Merry Christmas Ornament Tutorial: Part 1

Smiley from millan.net  Thank you everyone for all the nice comments you left me on the Blog Hop post and FaceBook!  It really means a lot to me!  I spent yesterday editing photos for the tutorial so you can make one for your very own.

It's not hard to put together, just a lot of steps.  So I've broken it up into 2 parts.  This post will show you how to make the base of the ornament, the next one will show you how to make the center embellishment and hanger.  And by all means, make it your own!  If you'd like to change something from what I've done, please do!  But I'd love to see what you created when you're done.  
Ready to get started?  Smiley from millan.net

Supply/Tool ListSmiley from millan.net
  • White Daisy cardstock
  • Twilight cardstock
  • Twilight ink
  • Very Merry Christmas stamp set
  • Silver Glitz Glitter Gel
  • Twilight Marker
  • Alcohol Blending Marker
  • Slate Satin Polka-Dot Ribbon
  • Bling Assortment buttons
  • Sparkles
  • White Daisy Embroidery Floss
  • Liquid Glass
  • Glue Dots & Mini Glue Dots
  • Artiste Cricut cartridge
  • Scoring Stylus
  • Paper Piercer
  • Blocks
  • Scrubber/Spritz


Cutting Your Pieces  Smiley from millan.net
(though I recommend a Cricut and paper trimmer over the chainsaw)
  1. Cut 20 ornament images at 3" (pg. 79 in the Artiste booklet) in White Daisy cardstock.  (One of the great things about our stamp sets that coordinate with our Cricut cartridges is the measurements for the images are right on the stamp sheet. No need to measure or guess what size to cut your image!)
  2. Cut 20 complimentary ornament images at 2½" in Twilight cardstock. (I used the ornament on pg. 47 of the Art Philosophy cartridge.  But any of the ornaments on pg. 53 of the Artiste handbook would work as well.  Just a matter of preference!)
  3. Cut two 3" circles, a 2" circle, and a 1" circle in White Daisy cardstock. (pg. 48 in the Artiste booklet).
  4. Cut the  Shift/Accent 4 image (pg. 79 in the Artiste booklet) at 1 ¾" in White Daisy cardstock.
  5. Cut a 1½" x 12" strip of White Daisy cardstock.  Score this at every ¼".
  6. Cut a 1" x 12" strip of Twilight cardstock.  Score this at every ¼". 
  7. Cut a 1" x 3" piece of White Daisy cardstock.  Score this at  ½", 1", 2", and 2½".
  8. Cut five 5¾" pieces of the Slate Satin Ribbon.
  9. Cut a 16" piece of the Sate Satin Ribbon.


Putting It TogetherSmiley from millan.net


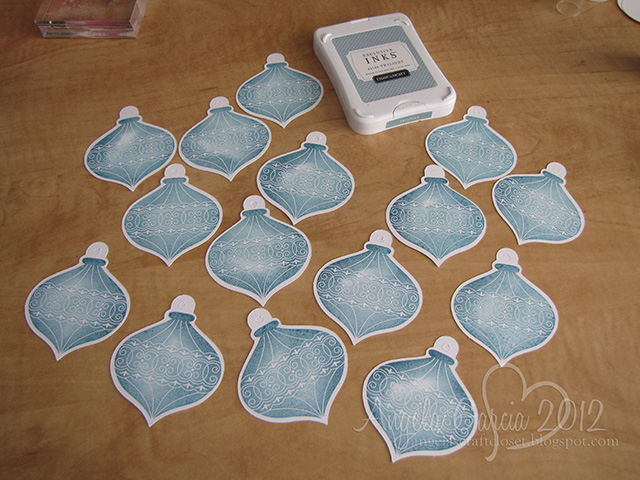
1. Stamp the ornament image onto 15 of the White Daisy cut outs.  Score down the middle.


2. Score 15 of the Twilight ornaments down the middle.


3. Take one of the scored ornaments and apply Liquid Glass to one side.


4.  Attach another ornament piece, then apply Liquid Glass to it's other half. 


5.  Attach a 3rd ornament, then apply Liquid Glass over the whole back.


6. Attach an unscored ornament piece to the back of the whole thing, creating a base.
Repeat steps 3-6 until you have 5 sets put together.


7. Do the same thing with the Twilight ornament pieces.


8.  When you've finished, you should have 10 3-D ornament pieces.


9.  Take the Silver Glitz Glitter Get and apply it to every edge.
(These photos show Glitz only on the raised edges, but I did go back over the outer edges with the Glitz.)


10.  Take one of the 3" White Daisy circles and attach the tops of the ornament pieces to it with Liquid Glass.  Set this aside for now.


11.  Take the 5 strips of ribbon and Mini Glue Dots.  Place one glue dot at the edge of the ribbon, centered along the long side.  You can almost see where it is in the photo.


12.  Pinch the two center edges together as shown in the photo.  Use your piecer to place another glue dot where indicated by the arrow.


13.  Rotate the ribbon and press down, creating a point on the ribbon.  Place another glue dot where indicated by the arrow.


14.  Flip the ribbon over and create another point on the ribbon.


15.  Do this with all 5 ribbon strips.


16.  Take the ornament base and add the ribbon points between each stamped ornament with Liquid Glass or regular Glue Dots.


17.  Add Glue Dots to the back of the Twilight ornaments (or use Liquid Glass) and attach to the center of the ribbon points.


Now you've completed the base of the ornament.  That wasn't so hard, was it? Smiley from millan.net

Stay tuned for Part 2!
Smiley from millan.net

Sunday, September 30, 2012

Very Merry Christmas: CTMH Stamp of the Month Blog Hop

Welcome to another fantastic Stamp of the Month Blog Hop!  If you're following along the path, you've just come from Judy's Blog.  If you've stumbled upon me while surfing, sit back and enjoy the 60+ ideas from some pretty talented CTMH Consultants!

I always love the October SOTM from Close To My Heart.  Why?  Because it is always a Christmas set!
And I love Christmas...just a bit. Smiley from millan.net

So let's have a look at this month's exclusive set, shall we?


Mittens, and ornaments, and sentiments...oh my!  Such a great collection!  I've had fun with this and have lots of ideas swimming around in my head, but for today I'll just share one of my projects...because it was a biggie!

I'm sure by now we've all seen those beautiful ornaments featured on that...other company's mini-catalog.  Smiley from millan.net  Well I knew it could easily have been created using this stamp set, even easier because it uses the new Artiste cartridge!  Just take a look.

Stamps: Very Merry Christmas October 2012 SOTM
Inks: Twilight
Papers: Twilight, White Daisy cardstock
Accessories: Sparkles, Slate Satin Polka-dot Ribbon, Bling Assortment,
Silver Glitz Gel, White Embroidery Floss
Tools: Art Philosophy & Artiste Cricut cartridges


This is a pretty large ornament.  It measures 7.5" long...12" with the ribbon hanger!  I'll have to find a special place for it in the house this season.  Somewhere it can catch the sun, it sure is sparkley!
Smiley from millan.net


Well I hope you've enjoyed my contribution to the hop.  I'll post a tutorial in a couple of days to show you how I made it.
 
Now you should head off to Kim's Blog and see her wonderful creation!  Thanks for stopping by!
Smiley from millan.net


Friday, September 28, 2012

Free CTMH Stamp Set and Monthly Giveaway

The end of the month is quickly coming...have you taken advantage of the National Stamping Month offer from CTMH?  Get the versitle double stamp set, It's Your Day, for only $5 with your $35 order!

 
As an extra bonus to my customers this month, when you place a $50 order through the "September Craft Closet Party" link on my website, not only can you get the SOTM for $5 and the It's Your Day set for $5, but I'll also give you your choice of stamp set (size A-D) for FREE!
Smiley from millan.net

Just contact me after you've placed  your order and let me know which stamp set you'd like.


You'll also have your name placed in a drawing for my monthly giveaway!  You can receive $25 in free CTMH product!  Smiley from millan.net

You've still got 2 days to take advantage of these great offers!  Don't miss out!


Wednesday, September 26, 2012

Clearly the Best: Terrific Two-Tone

Another great video with Monica and Kristine!  This time, they share tricks and tips for using the Base and Shade technique.  This is an awesome technique to use with our My Acrylix stamp sets!


Visit MyCraftChannel for more ideas and stop by my website to get your own My Acrylix stamps for your crafting fun!


Mom Growing Pains

Last night, I experienced a first in my years as a mom...sending my child off on an overnight school trip.  All I could think was  Smiley from millan.net  I was hoping I wasn't the only one, but all the other parents seemed okay.  Even Engineer was cool and calm!  So I did the next best thing...I faked it. Smiley from millan.netNot very convincingly though, I'm sure.

Just about now, Bio-Comp and his classmates are reaching the Magic Kingdom at Disneyland.  I know!  Why wasn't I asked to be a chaperone? Smiley from millan.net 

Even though I was am nervous about him being away from home, he totally deserves to have this fun time with his friends.  He's worked really hard his first quarter in middle school.  He's joined lots of clubs, kept his grades up (got on the High Honor Roll even!), and participated on the Cross Country team!

After he was packed, I slipped this card into his suitcase.  I wanted him to know how proud we all are of him! 
 
Stamps: Superhero WOTG
Papers: Superhero Reflections Kit
Inks: Black, Honey
Accessories: Silver Shimmer Trim, Comic Badges
Tools: Art Philosophy Cricut cartridge
 
Now I think I'll just spend the day in my room...waiting for the phone to beep with a text from Bio-Comp telling me how much fun he's having...Smiley from millan.net ...without his mom!


Shareaholic

Related Posts Plugin for WordPress, Blogger...