Thursday, October 25, 2012

Heart 2 Heart Challenge: Christmas

Well it seems as if I'm doing the October Heart 2 Heart Challenges backwards!  It just so happens I've had some pieces waiting to share and the challenges are lining up perfectly with them.

So last week's challenge was to share a Christmas creation.  I made these gift boxes to show at our Open House in August and now I can share with you!  (Believe me, it is hard to get into the Christmas spirit of creating during August in Tucson!)
Smiley from millan.net

Inks: Cashmere
Papers: Pear & Partridge Reflections Kit
Accessories: Dimensional Elements In Color-Holiday

These cute little trees boxes are cut from the Pie Box on page 70 of the Artiste cartridge.  I used the Pear & Partridge papers and cut them at 6", 4.25", 3", and 2.25".  A little sponging with Cashmere ink, decorate with the Holiday DE and you're good to go! Smiley from millan.net

If you choose to use them as decorations instead of treat boxes, they nestle very nicely inside one another for storage!


Tuesday, October 23, 2012

Heart2Heart Challenge: Halloween or Pumpkin

Smiley from millan.net  This is my boys' favorite time of year...just before Halloween when the antici...pation for Trick or Treating is nearly overwhelming.Smiley from millan.net  And while we don't exactly have falling leaves around here, it is cool enough during the early day to keep all the doors and windows open...and that's a plus with me!

I've been waiting to show this Stamp Camp project properly and with the Heart2Heart Challenge this week being Halloween or Pumpkin themed, it was the perfect time!  And it has been so long since I've been able to join in on the challenges, I've missed them.   What's more, I think I'll be able to complete every challenge this month!  Woohoo for me!

Okay, now back to this week's challenge.  This Halloween project was the project I created for the Holiday Stamp Camp back over Labor Day.  And it was also my Creative Class held last week.  The ladies loved it!  Take a peek:

The top of the My Creations Card Box is decorated with the new Moonlight Complements Dimensional Elements and Olive Twine from the Baker's Twine Harvest Assortment.  I used Liquid Glass to highlight bits of the banner pieces and the cat's eyes and nose.  There is also a touch of Green Glitz Glitter Gel (say that 5 times fast!) on its eyes.  The long banner piece is for writing the name of the recipient of your wonderful Halloween treat!


The front of the box has a couple of cute pumpkins and a spooky ghost from the complements sheets.


And once again, I used Liquid Glass and highlighted the ghost's eyes and mouth as well as the pumpkins' eyes.  Green Glitz for the stems and around the EEK! for a touch of sparkle.


Open up the box and you have a cute little Halloween scene!  Lots of Glitz and Liquid Glass to add sparkle: moon, windows, Frank, the spider.  Even some Silver Glitz on the "cauldron"!


The cupcake wrapper was cut at 1.75" from the Artiste cartridge, found on page 77.  Fill it with a bag of your favorite candy! Smiley from millan.net


A couple of Tombstones to decorate the sides of the box, cut from the Artiste at 2.8 cm in Whisper and Slate cardstock.  I filled in the RIP with Silver Glitz.


Quick and easy to put together...well, aside from all the waiting for everything to dry part!


I hope you enjoyed my little project!  So now are you wondering how I colored the box itself?  Easy, but not necessarily neatly!  I did one box for my display for camp.  This was done with our Spray Pens, Black reinker, water, alcohol, and Create-A-Shade Pearl Paint.  Well, I needed to get several boxes done for camp and our little Spray Pens only hold so much.  I used one of our travel spray bottles and made a big batch of the spray.  It worked fantastically!

Until I realized something important. Smiley from millan.net
So if you attempt to make many boxes at a time as gifts, one word of caution:


Saturday, October 13, 2012

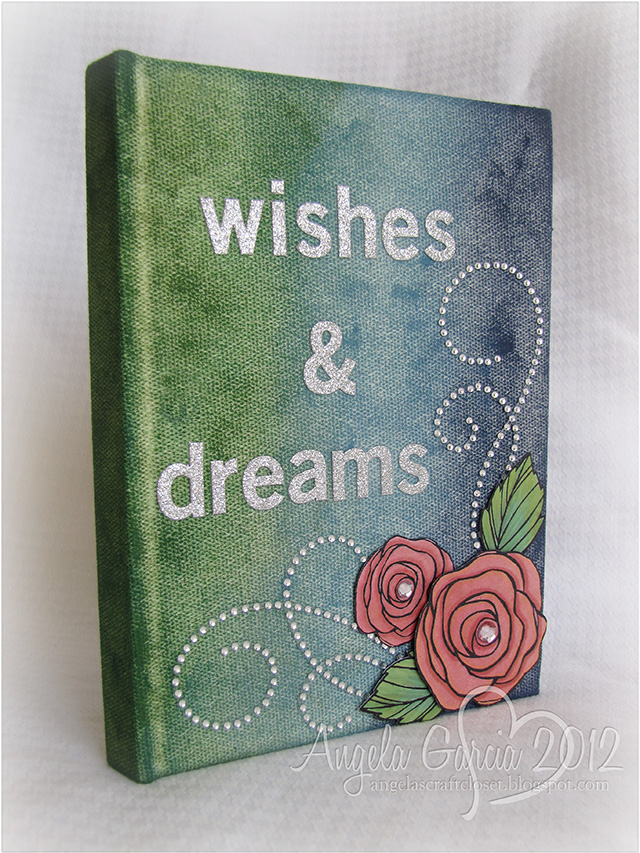
Wishes & Dreams

Smiley from millan.net
It is a wonderfully chilly morning here.  Ah, maybe Fall has come to the desert at last!  I love when I can open up the doors early and hear the day start.

Engineer and Bio-Comp are off to a Scout activity and the other two boys are still in bed.  One last sleep in before school resumes Monday I guess.  So right now I have a quiet house to myself.  The last 3 weeks with the boys home have been wonderful, but I think I'm ready for them to go back to school and be on a schedule again!

This morning, I'm going to share another Stamp Camp project from a couple of months ago.  Our fearless leader Kim (she'd have to be fearless to let us take over her downstairs for the weekend!) created a project using the new My Creations Canvas Journals.  She used the Flirty paper, Sparkle Flourinshes, Love Blooms stamp set and Canvas Alphabet.  It was a totally adorable project...and I went a completely different direction with mine...as you can see!  Smiley from millan.net


Stamps: Love Blooms
Inks: Ponderosa Pine, Indian Corn Blue, Outdoor Denim pigment inks, Archival Black
Hollyhock, Topiary, Sweet Leaf marker sets
Accessories: My Creations Canvas Journal, Pixie Glitter Alphabet, Sparkles Flourishes, Sparkles
Tools: Liquid Glass,3D foam tape 
 Smiley from millan.net
 
I took the new pigment inks and simply rubbed them all over the canvas until I got the coverage I wanted.  While that dried, and it does take a while for the inks to dry  Smiley from millan.net, like get-out-your-heat-guns-and-zap-it-awhile time for it to dry, I stamped and colored my roses and leaves.  I love the new alcohol markers...I think I've said that once or twice before already...but I truely do!  I even colored the Sparkles in the roses with the markers!
 
So after the journal was mostly dried,  I attached the Sparkle Flourishes.  I did have to use little drops of Liquid Glass here and there to keep it attached to the canvas.  I popped up the leaves and roses with 3D tape and placed them on.  Then I used the Pixie Glitter letters (which I won at Stamp Camp, thank you Kim!) for the title.  That was probably the hardest part of this whole project, coming up with a title!
 
And now I have a beautiful journal waiting for me to fill it up!
 
Let's see...wishes and dreams of a mom with 3 (or 4) boys.  How about: 
help with laundry Smiley from millan.net
shopping Smiley from millan.net
cleaning up Smiley from millan.net 
making dinner Smiley from millan.net
kids not fighting     Smiley from millan.net
and getting to sleep in myself every once in a whileSmiley from millan.net
 
Yeah, I'll let you all know when that happens!
 
 
Have a great weekend everyone!  I'm off to set up tables for an afternoon class of Trick or Treat Boxes!


Sunday, October 7, 2012

Poinsettia Christmas Cheer

I love Pinterest.  Really...but as I was telling a friend this weekend, it is such a blessing and a curse!
It is so full of ideas and information, I would totally be lost if it went away.  And my family would starve, too!  Just kidding, they don't get to eat anyway, I'm always on Pinterest!!!

Anyway, I saw this card by KittieKraft and knew I'd have to copy it.

And I know it is only October, but I have Christmas cards on the brain!
Especially since I have this month's SOTM on my desk...staring at me...calling out to me.Smiley from millan.net

So one more card for now, then maybe I can get some Halloween things made.

This card was another quick and easy one to put together.  All the cuts were made with the Artiste cartridge. 

Stamps: Very Merry Christmas October 2012 SOTM
Inks: Ponderosa Pine, Ruby, Creme Brulee marker
Papers: White Daisy, Ponderosa Pine, Ruby cardstock
Accessories: Pearl Opaques, Gold organdy ribbon
Tools: Artiste Cricut cartridge, Rub-On Tool, Spray Pen


Did you know you can make a poinsettia with a star?Smiley from millan.net 

Pretty neat, right?  Here is how I put it together:

I used the star on pg. 80 of the handbook, cut in various sizes: two at 3.25" in Ponderosa Pine, and one of each at 3", 2.75", 2.5", and 2.25" in Ruby.  Flowers are not flat, so I placed them on my VersaMat and used my Rub-On Tool to gently roll around the center of each leaf/petal piece.  It curled it up nicely.  I layered it, rotating each piece as I went.  Then gave the whole thing a couple of squirts of water with my Spray Pen.  I rolled the layers up a little more and centered it in my frame.

The frame is found on pg. 60.  I cut it at 5.25" and again at 4.75" out of White Daisy and layered them.  After all the pieces were in place, I colored some Pearl Opaques with my Creme Brulee alcohol marker and placed them in the middle of the petals.  I cut some strips of ribbon, made some loops and placed them under the leaves.  Then I stamped the sentiment from the Very Merry Christmas stamp set in Ruby ink.  That was it!

This is a big card, 6" x 6" and very dimensional so I won't be mailing it!  But it will fit nicely in boxes that are being shipped for the holidays.

Oh!  That reminds me, I have to start my Christmas shopping soon!  Smiley from millan.net

How about you??


Thursday, October 4, 2012

A Very Merry Christmas Card

I'm so pleased that so many of you liked my ornament I posted the other day!  It warms my heart.
  Smiley from millan.net
Thank you!

Today I'm going to share another card I've made with the Very Merry Christmas SOTM set.  This time I was going for more of a rustic Christmas look.

Stamps: Very Merry Christmas October 2012 SOTM
Inks: Desert Sand, New England Ivy, Ruby
Papers: Colonial White, Ruby, Kraft cardstock
Accessories: Create a Shade Pearl Paint
Tools: Paper Piercer, Square punch, Spray Pen


This was an easy and quick card to put together.  I mixed up some Create a Shade Pearl paint and water in the Spray Pen to give the Kraft cardstock a bit of shimmer.  Then I paper pieced the tree and gifts.  The banner was made with a strip of cardstock and I used the square punch to notch out the end.  And that was it!  May have to use this as some of my cards this year.
It's about that time to get started! Smiley from millan.net


Want to make your own card?  Get all your supplies over at my website!  And be sure to JOIN the October Craft Closet Spooktacular when you place your order...your name will be put into a drawing for $25 in select CTMH product when you do!


Wednesday, October 3, 2012

Clearly the Best: Dauber Dynamite

Have you every wanted to add rainbows of color to your artwork?   Watch the newest video from MyCraftChannel and learn how easy it can be from Kristine and Monica.


Shareaholic

Related Posts Plugin for WordPress, Blogger...