Monday, April 29, 2013

Heart 2 Heart Challenge: Tuck It In!

Good morning and welcome to this week's challenge from Heart 2 Heart
 
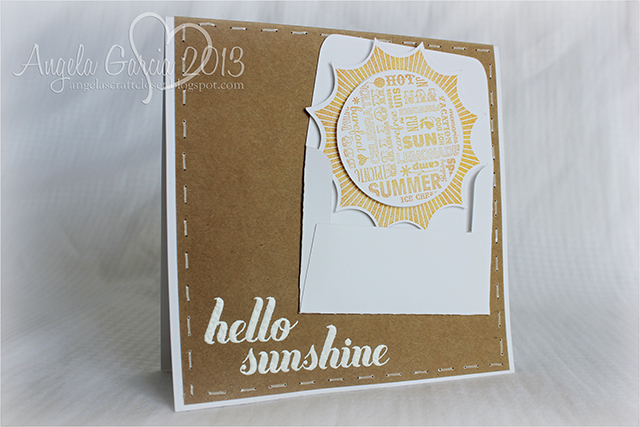
This week, we'd like to see everyone's project showcase an envelope of some kind.
 From Millan.Net
 
One great place to find some really cute envelopes is of course either of the two great Cricut cartridges from CTMH! 
 
Be sure and visit the H2H Blog and see the other DT members' creations, but first...please take a peek at mine!
 
 
Stamps: My Sunshine (April 2013 SOTM), Patterned Pennants
Inks: Honey, Sunset, White Daisy Pigment, chalk marker
Papers: Kraft, White Daisy cardstock
Tools: Art Philosophy & Artiste Cricut cartridges, piercer, craft heater, white embossing powder

I know lots of places around the country are experiencing an unusually cool/cold/snowy Spring.  If I could pack up some of the warm/hot weather we're having here in Tucson I would gladly share it! From Millan.Net

So now get cracking on your own projects...can't wait to see how you use an envelope in your creations!

Just remember a few things...

Heart2Heart Challenges Rules:

1.Use Close To My Heart products. Your project doesn't have to be 100% CTMH, but you must use some. After all, this is a challenge blog created and sponsored by CTMH consultants.
2.Incorporate this week's challenge...use an Envelope to Tuck It In!
3.Link your project back to Heart 2 Heart from your blog or online gallery. If you are linking from a blog, you must link directly to the actual post, not your entire blog.
4.You also need to mention Heart 2 Heart (H2H) in your blog post.
5.Finally, we ask that you consider turning off word verification, as it makes it easier for the design team (and others) to leave comments.

Happy Crafting!

Monday, April 15, 2013

Heart 2 Heart Challenge: Button, Button...Who's Got The Button?

Koumponophobia...if you suffer from the fear of buttons, this week's challenge from Heart 2 Heart is not for you!From Millan.Net

On the other hand, if you're like me and love to just scoop up handfuls of buttons and let them fall through your fingers...
From Millan.Net
well, get ready for a challenge right up your alley!!


This week the design team at H2H is sharing some pretty awesome artwork using buttons.  Visit the H2H Blog to see the others' creations, but first take a peek at my Love Canvas!


My Creations 6X6 Canvas Display
Accessories: Basic Assortment Buttons, Mini-Medley Accents Antiqued Gold Collection,
Burlap Ribbon, Embroidery Floss Neutral Assortment
Tools: Staple Gun
 
 
Here is a close up shot:


Now if you'd like to see the other DT members' creations, head over to the H2H Blog and enjoy!  If you'd like to stick around and see how I made this, carry on!

 
These are the basic supplies you'll need.  Plus a staple gun and mini glue dots.


Snip off 4 pieces of the Burlap ribbon, as wide as the edge of the canvas.  This will cover the corners when you begin wrapping the canvas.  I used glue dots to hole them down.


Before I started, I did take off the hanger on the back of the canvas.  When you've done that, simply staple the edge of the ribbon to the back, wrap around the front, and staple on the back of the other side of the canvas.

Rotate the canvas and do the same thing with the ribbon going the other way. 


When you're done, your canvas should look like this.


I knew each of the letters would have to be smaller than 3"x3", so I placed my buttons on my VersaMat until I got them the way I liked and the right size.  I used mini glue dots to place them on the canvas, one letter at a time, so they wouldn't move as I stitched them on.  The frame of the canvas is pretty wide, and several of the buttons were above that.  But with the give of the canvas, I could still run my needle and thread through the buttons...it just took a while longer than it normally would have.

Well, I hope you've enjoyed by Button, Button creation!  I can't wait to see what you come up with!

Remember:
1.Use Close To My Heart products. Your project doesn't have to be 100% CTMH, but you must use some. After all, this is a challenge blog created and sponsored by CTMH consultants.
2.Incorporate this week's challenge...BUTTONS!
3.Link your project back to Heart 2 Heart from your blog or online gallery. If you are linking from a blog, you must link directly to the actual post, not your entire blog.
4.You also need to mention Heart 2 Heart (H2H) in your blog post.
5.Finally, we ask that you consider turning off word verification, as it makes it easier for the design team (and others) to leave comments.

Happy Crafting!

Saturday, April 13, 2013

Close To My Heart Word Collage

I wanted to share one of the gifts I made for the Stamp Camp gift exchange last month.

I used a 12"x12" canvas I got at Michael's and created a Close To My Heart word collage!


My upline Sue, at LattaStamps, picked this from our stack of prizes.

This was really easy to create.  I first painted the whole thing with Create-A-Shade Pearl Paint, though it is hard to tell in the photo.  Then after designing and cutting the vinyl pieces on my computer, I transferred them to the canvas.  After making sure they were good and stuck, I painted over the whole thing again with the Pearl Paint.  Why?  Because this makes sure to seal the letters down, and any paint that may seep underneath will be the same color as the base coat.  When that was dry, I put my top coat of a black canvas paint...well, on top.  After that dried, then I carefully peeled off all the letters and shapes.  Then I used the gel medium from this project to seal it.

Done and done!  I have more canvases that are just screaming to be decorated as well.  I love this quick and easy project!

Wednesday, April 10, 2013

Photo Canvas Tutorial

Canvas art has become really popular in the crafting/home décor world!  And why not?  With a blank canvas, you can create absolutely anything you'd like!
From Millan.Net

I love the new My Creations 6"x6" Canvas Displays.  I wanted to create something for my home and with all the easy step by step instructions you can find online, I decided to jump right in and make my own!


This was so easy to make, I'm thinking of doing a wall collage of each of my boys.  Let me walk you through the process.
 
These are the supplies you'll need.


I got the canvas gel medium at Michael's in the art department.  (Bring along a coupon!)   And what about your photo?  This tutorial doesn't use an actual photo.  Rather, you'll want to print your photo on plain copy paper.  ***Be sure to use a laser printer!***  If you use an ink jet printer, your photo will run and bleed and give it a really watercolor, artsy-fartsy look.  Ask me how I know that. From Millan.Net
 
So I didn't actually take photos while I was making it, simply because after the, ahem, ink jet incident I wasn't too sure how this would turn out!  But I'll give you step by step details, and if anyone needs it, I'd be happy to make another one and take photos of that!
  1. I sized my photo in Photoshop and made it black and white.  I also mirrored it so it would come out the right way when it was done.  (Then I had to email it to Engineer to print at work on their laser printers!)  I made the photo just under 6"x6", but when I trimmed the paper I gave myself a big enough border around the photo to handle it when it came time to place it on the canvas.
  2. Take your gel medium and foam brush and give the canvas a good coat.  Not too thick, but enough to see it.
  3. Take the paper with the photo and spritz it with water.  Really.  Don't soak it, but get it nice and wet.  (This is why you need to use a laser printer!)
  4. Making sure the canvas is in the right direction, lay the paper photo side down onto your canvas.  Yes, onto the wet gel medium.
  5. Smooth out any bubbles.  Use a credit card, fingers, or I used my stoneware scrappers from Pampered Chef!  Just be sure you don't tear the paper.  I also flipped mine over and smoothed a bit from the back side.
  6. Now...wait.  I'm not a patient crafter, so placed mine under the ceiling fan in the family room and turned it on high. From Millan.Net
  7. It should be good and dry now, right?  Well when it is, take your spray bottle and soak it. You heard me right...get it good and wet!  Like water-running-off-making-puddles wet! From Millan.Net
  8. When you have it soaked to the bones, then it's time to gently peel the paper off.  The photo stays on the paper...how cool is that?!?
  9. Once you get the paper peeled, the tedious part starts.  Being ever so gentle, start rubbing the paper fibers off the photo.  Use a circular motion with little pressure.  Too much pressure and you'll rub the photo off.  As the canvas dries, you'll be able to see the fibers better.  Just spray again and work in sections until you have them all off.  Be extra careful around faces and details you want to keep.  (I did rub a little harder in some spots to take the photo off on purpose, just to give it an aged look.)
  10. When you have it done to your liking, let it dry.  Again. From Millan.Net
  11. Cover the entire canvas with the gel medium to seal it and let it dry.  And you're done!!
 Here is a close up of the canvas:
 
 
The gel leaves brush strokes, like a finished canvas.
 
I hope you'll share with me any canvas photos you make!  If anything wasn't clear in the directions, just let me know and I'll whip up another post with photos! 


Monday, April 1, 2013

Heart 2 Heart Challenge: Pun Fun!

Are you ready for some silly craftiness this morning?   From Millan.Net

What better way to celebrate April Fool's Day than with some puns!  Now, I don't normally go for puns...a house full of three boys has cured me of that...but one thing that comes to mind when I think of them are cute gift ideas.  And since the end of school is coming (believe me, it will be here before you know it!), I thought I'd get a head start on some teacher gifts.

I knew I wanted to use one of the many boxes on the Artiste cartridge.  I chose the milk carton after being inspired by photos from this party.  I couldn't resist a good old milk and cookie theme!

Here is what I came up with:

Stamps: Distressed Backgrounds
Inks: Saddle, Indian Corn Blue
Papers: White Daisy, Saddle, Indian Corn Blue cardstock, transparency sheet
Accessories: Hook and Loop Dots
Tools: Artiste, Art Philosophy Cricut cartridge

The carton is found on page 46 in the Artiste handbook, under the 3D Object.  I used the Fit to Page feature and it cut out at 5.25".  I used the Center Point feature to cut out a circle in the front panel.  Can you believe I've never used that feature before now?!?  The Saddle band is 1.75" x 12".  I stamped the burlap stamp from the Distressed Backgrounds set in Saddle ink and attached it around the carton.  (I scored and adhered each side as I went so not to cause any buckling.) Then I used a craft knife to cut out the band covering the window.  The scalloped circle is found on page 31 in the Art Philosophy handbook, under Layer.  I cut this out at 2.25" to frame the window.  The window is covered by a small piece of transparency sheet attached to the inside of the carton.  I also traced the top flaps onto Saddle cardstock to accent to top of the carton.

So where's the pun?  Here is a shot of the other sides of the carton:


See?  Pun-y!   From Millan.Net
 
I created the sentiment and the Nutrition Facts on my computer.  I used the Center Point feature to cut around the "Smart Cookie".  (Why have I never used this before now??)  The Nutrition Facts were just something I had seen floating around somewhere, but according to my boys it "totally looks like the real thing!"
 
 
So what can you create this week to go with our Heart 2 Heart challenge?  Be sure to stop by the H2H blog and see the other Design Team's creations...they're a hoot!
 
Just remember a few of the guidelines for playing along:
 
Heart2Heart Challenges Guidelines:
  1. Use Close To My Heart products.  Your project doesn't have to be 100% CTMH, but you must use some.  After all, this is a challenge blog created and sponsored by CTMH consultants.
  2. Incorporate this week's challenge...Pun Fun!
  3. Link your project back to Heart 2 Heart from your blog or online gallery.  If you are linking from a blog, you must link directly to the actual post, not your entire blog.
  4. You also need to mention Heart 2 Heart (H2H) in your blog post.  
  5. Finally, we ask that you consider turning off word verification, as it makes it easier for the design team (and others) to leave comments.


Oh, and those cookies in the carton?  I know they won't still be good by the end of May...
From Millan.Net
 But it was a good excuse to make a few dozen!  From Millan.Net


Shareaholic

Related Posts Plugin for WordPress, Blogger...