
I've been making my Holiday Stamp Camp project for the past couple of days...well, not making it exactly. Designing it in my head and working with the supplies I have on hand is more like it. But the final piece to the puzzle arrives today...my new Artiste Collection! It's on the truck out for delivery right now!

I'm beside myself with giddiness!

Back to my post though. While I was working on other things for Stamp Camp, I realized I hadn't shown you my project from the last one in April. I love this project. Jacob's Ladders are so fun to make and play with! And my favorite paper from the previous Idea Book,Victory, is still available!
Yeah!
So let me share with you how I made it, in case you've never come across this fun piece of papercraft!
These are the supplies I used:
- Eight 3"x3" chipboard pieces from My Creations Memory Game
- Four 3"x3" squares of cardstock
- Four 3"x3" squares of B&T pattern paper
- Eight
shapes from CTMH Art Philosophy cartridge (pg. 53), cut at 2.75" - Three 20" strips of CTMH Color-Ready Seam Binding Ribbon
- Ruler and pencil
- Bonding Memories Glue
- Sanding Block
- Inks
- Sponge
- Micro-Tip Scissors
- Strong adhesive tape (I used Score-tape)
- Liquid Glass
- Flat Embellishments (I used Tough Tags and Durables Studs)

1. With a ruler, draw lines on the back of all the chipboard pieces at 0.5", 1.5", and 2.5".

2. Using Gonding Memories glue, adhere all the squares to the front of the chipboard pieces. Take the sanding block and round the edges. Use scissors to trim any excess as needed. Then sponge each covered chipboard piece and Cricut square. Adhere the Cricut squares centered on the chipboard pieces.

3. On the back of each piece, add a strip of super strong tape to each drawn line.

4. Starting with your cover piece, take the 3 strips of ribbon and place them on the tape strips as shown above: top and bottom piece trailing off to the right, middle piece trailing off to the left. Use Liquid Glass in between the ribbon for extra strength.

5. Remove the backing from the adhesive from your next piece and add it directly onto your first piece, sandwiching the ribbon in between.

6. Pull the ribbon across the top of your piece so they run in the opposite direction.

7. Place yournext shipboard piece on top of the ribbons. Making fure the ribbons are not twisted, pull them snugly. Remove the backingfrom the adhesive and pull the ribbon strips across.
Repeat steps 4-7 until all the pieces are used.

8. Trim any excess ribbon.


9. Your front and back should look like the photo above. When placing your own photos onto the project, slip them under the ribbon, otherwise the ladder will not flip correctly. Keep your embellishments simple and flat.
Here is my finished project with photos of all my boys.

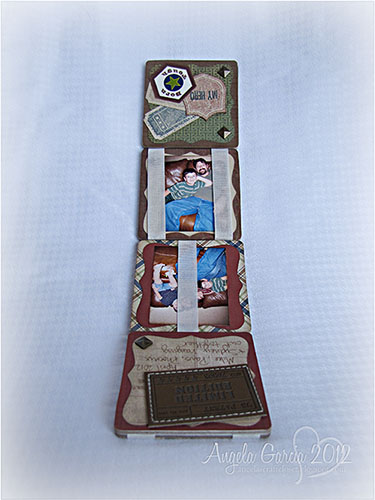


I know some of my photos are upside down. I did that on purpose. When you flip the ladder, they come up right-side up with the ribbon on the two sides instead of running through the middle of the photo. Did that make sense?

Back to work!!
If you make your own Jacob's Ladder, please share it! I'd love to see your work!

No comments:
Post a Comment