Showing posts with label My Creations. Show all posts

Saturday, July 12, 2014

Close To My Heart Briefcase

Good Saturday to you all!  We are finishing up on our summer break here in our area.  Yup, school starts Monday!
From Millan.Net

My boys are on the fence about going back.  Loquacious is moving on up to 6th grade and that means he'll be in middle school with Bio-Comp, who is in 8th grade this year.  And that leaves Knock-Out starting 3rd and at school without either of his brothers for the first time ever.  He's is actually excited about that...finally being the only Garcia brother at school! From Millan.Net

So while we are enjoying a last ditch effort of being lazy...because our summer was anything but lazy From Millan.Net
...I'm going to share a little project I started at Stamp Camp and just now finished.

 It's my Close To My Heart Briefcase...
 
 
Inks: Chocolate
Papers: Skylark paper pack, Chocolate cardstock
Accessories: My Creations Journaling Cards Box, Burlap Ribbon, wooden buttons, hemp, antique copper brads, Velcro dots
 
 
I made it to accompany me when I do Home Gatherings.  Inside are things that remind me, and let others know, why I love being a part of the CTMH family.  I haven't got around to filling it yet, but the idea is to put a photo of my family because this "job" lets me stay available for them, a watch because I set my own work hours, money because...well, I get paid to have this much fun!  You get the idea. From Millan.Net

 
Here is a shop of the back, complete with a pocket in the back to hold my business cards! 


Be sure and stop by tomorrow evening, there is a great blog hop that will be going around! From Millan.Net
 

Sunday, November 10, 2013

Gratitude with an Attitude Blog Hop

Good evening everyone!  I hope you're enjoying a restful Sunday with family and friends.  Tonight I invite you to take a stroll down our team's blog hop and see some pretty great projects.

This month we've focused on Gratitude and everything that means to us.  If you're following along the hop already, you've just come from Melinda's Blog.  Let me guess, something with lots of bling??
 From Millan.Net
I love her love of all things blingy!! From Millan.Net


Well let me show you my project.  First of all, I am grateful for many things...especially a very patient and helpful husband who will calmly tell me to try something new when a project kind of blows up in my face.  Which it did...several times this week.  I still want to go back and get it right but for tonight I'll share my back up project.

When CTMH came out with the My Creations® Collage Cubes a while ago, I wanted to try making a photo puzzle but just never got around to it...until now.

I've used photos of people I am most grateful for in my life.  Enjoy!


Of course my boys and my family...


My dad and stepmom...just look how happy they are together!!
Engineer and I on the Eiffel Tower in Vegas...


Me and my siblings a playing card game, something we always end up doing when we're together...


A perfect day at White Sands, NM.  The boys love to visit here and play in the sand!


My parents got to travel with Engineer and I when our school band went to Europe...


My mom...still miss her and am so grateful to be her daughter.


This guy...puts up with more than he should and I can't imagine life without him!  (sorry if that embarrassed you, sweetie!) From Millan.Net


One of my favorite shots of the boys this summer.


I had saved a small puzzle from one of the boys' kids' meals some time hoping to use it as a model to make my own.  Luckily, I found this awesome tutorial and didn't have to short a fuse figuring it out myself!
From Millan.Net

Our Creation Cubes measure 2" so this makes a nice big puzzle to sit on a table for display.  I will most likely give it a thin coat of Modge Podge this week...and maybe sand the edges, too.  But for now, I'm grateful to have it finished!

Now moving on...head over to Becky's Blog and see what fabulous project she's got prepared for you!


Monday, April 15, 2013

Heart 2 Heart Challenge: Button, Button...Who's Got The Button?

Koumponophobia...if you suffer from the fear of buttons, this week's challenge from Heart 2 Heart is not for you!From Millan.Net

On the other hand, if you're like me and love to just scoop up handfuls of buttons and let them fall through your fingers...
From Millan.Net
well, get ready for a challenge right up your alley!!


This week the design team at H2H is sharing some pretty awesome artwork using buttons.  Visit the H2H Blog to see the others' creations, but first take a peek at my Love Canvas!


My Creations 6X6 Canvas Display
Accessories: Basic Assortment Buttons, Mini-Medley Accents Antiqued Gold Collection,
Burlap Ribbon, Embroidery Floss Neutral Assortment
Tools: Staple Gun
 
 
Here is a close up shot:


Now if you'd like to see the other DT members' creations, head over to the H2H Blog and enjoy!  If you'd like to stick around and see how I made this, carry on!

 
These are the basic supplies you'll need.  Plus a staple gun and mini glue dots.


Snip off 4 pieces of the Burlap ribbon, as wide as the edge of the canvas.  This will cover the corners when you begin wrapping the canvas.  I used glue dots to hole them down.


Before I started, I did take off the hanger on the back of the canvas.  When you've done that, simply staple the edge of the ribbon to the back, wrap around the front, and staple on the back of the other side of the canvas.

Rotate the canvas and do the same thing with the ribbon going the other way. 


When you're done, your canvas should look like this.


I knew each of the letters would have to be smaller than 3"x3", so I placed my buttons on my VersaMat until I got them the way I liked and the right size.  I used mini glue dots to place them on the canvas, one letter at a time, so they wouldn't move as I stitched them on.  The frame of the canvas is pretty wide, and several of the buttons were above that.  But with the give of the canvas, I could still run my needle and thread through the buttons...it just took a while longer than it normally would have.

Well, I hope you've enjoyed by Button, Button creation!  I can't wait to see what you come up with!

Remember:
1.Use Close To My Heart products. Your project doesn't have to be 100% CTMH, but you must use some. After all, this is a challenge blog created and sponsored by CTMH consultants.
2.Incorporate this week's challenge...BUTTONS!
3.Link your project back to Heart 2 Heart from your blog or online gallery. If you are linking from a blog, you must link directly to the actual post, not your entire blog.
4.You also need to mention Heart 2 Heart (H2H) in your blog post.
5.Finally, we ask that you consider turning off word verification, as it makes it easier for the design team (and others) to leave comments.

Happy Crafting!

Saturday, October 13, 2012

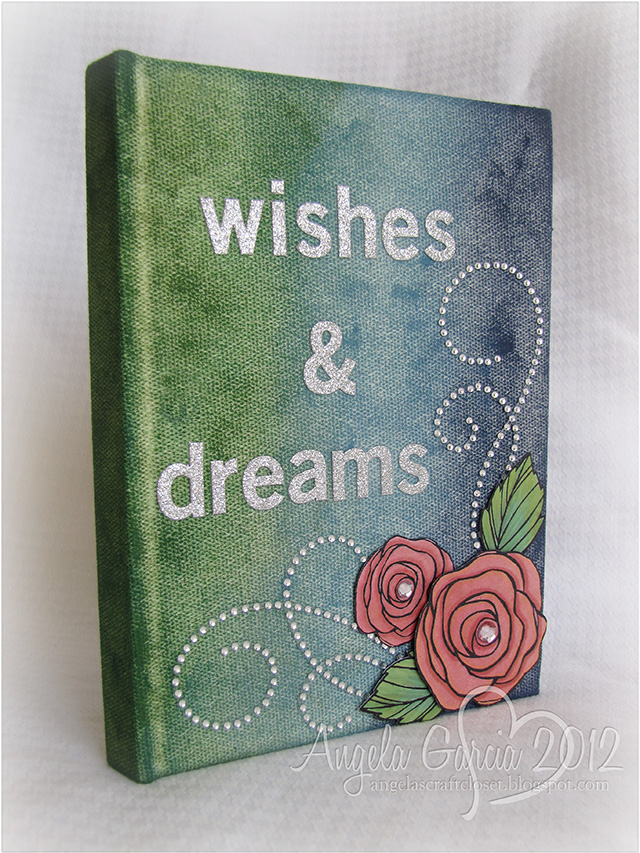
Wishes & Dreams

Smiley from millan.net
It is a wonderfully chilly morning here.  Ah, maybe Fall has come to the desert at last!  I love when I can open up the doors early and hear the day start.

Engineer and Bio-Comp are off to a Scout activity and the other two boys are still in bed.  One last sleep in before school resumes Monday I guess.  So right now I have a quiet house to myself.  The last 3 weeks with the boys home have been wonderful, but I think I'm ready for them to go back to school and be on a schedule again!

This morning, I'm going to share another Stamp Camp project from a couple of months ago.  Our fearless leader Kim (she'd have to be fearless to let us take over her downstairs for the weekend!) created a project using the new My Creations Canvas Journals.  She used the Flirty paper, Sparkle Flourinshes, Love Blooms stamp set and Canvas Alphabet.  It was a totally adorable project...and I went a completely different direction with mine...as you can see!  Smiley from millan.net


Stamps: Love Blooms
Inks: Ponderosa Pine, Indian Corn Blue, Outdoor Denim pigment inks, Archival Black
Hollyhock, Topiary, Sweet Leaf marker sets
Accessories: My Creations Canvas Journal, Pixie Glitter Alphabet, Sparkles Flourishes, Sparkles
Tools: Liquid Glass,3D foam tape 
 Smiley from millan.net
 
I took the new pigment inks and simply rubbed them all over the canvas until I got the coverage I wanted.  While that dried, and it does take a while for the inks to dry  Smiley from millan.net, like get-out-your-heat-guns-and-zap-it-awhile time for it to dry, I stamped and colored my roses and leaves.  I love the new alcohol markers...I think I've said that once or twice before already...but I truely do!  I even colored the Sparkles in the roses with the markers!
 
So after the journal was mostly dried,  I attached the Sparkle Flourishes.  I did have to use little drops of Liquid Glass here and there to keep it attached to the canvas.  I popped up the leaves and roses with 3D tape and placed them on.  Then I used the Pixie Glitter letters (which I won at Stamp Camp, thank you Kim!) for the title.  That was probably the hardest part of this whole project, coming up with a title!
 
And now I have a beautiful journal waiting for me to fill it up!
 
Let's see...wishes and dreams of a mom with 3 (or 4) boys.  How about: 
help with laundry Smiley from millan.net
shopping Smiley from millan.net
cleaning up Smiley from millan.net 
making dinner Smiley from millan.net
kids not fighting     Smiley from millan.net
and getting to sleep in myself every once in a whileSmiley from millan.net
 
Yeah, I'll let you all know when that happens!
 
 
Have a great weekend everyone!  I'm off to set up tables for an afternoon class of Trick or Treat Boxes!


Saturday, August 18, 2012

La Belle Vie Bracket Frame

Engineer has been out of town lately...a lot. In fact, right now he's gone again for another week.
(I know he reads my blog so I'll just go ahead and embarrass him right now.)  Miss you Sweetie! Smiley from millan.net

One of the only plus sides to him being gone is that I can craft all I want and not feel too guilty about it.  Sure the house suffers a little, and the boys get to eat all the pizza they want Smiley from millan.net, but Mom gets to craft and that's what's important, right?!?

I'm totally just kidding, you know that right, Engineer?  The boys are eating fine and the house isn't too much of a disaster zone. Smiley from millan.net


Truthfully, I have been working on things for an upcoming Idea Book Open House.  This is one of my favorite things I've made so far!


It is the new My Creations Bracket Frame!  I love, love, love it!  It measures just at 11" x 11" and has a  7" x 7" opening.  It really is a shadowbox with a 1" depth, so you can add lots of memorabilia inside it!
It is a white chipboard frame and easily takes ink.  I've sponged it using the new Champagne ink, then added depth by very lightly sponging on Cashmere and Saddle ink as well.

Here I've used the new La Belle Vie paper kit.  It comes with 2 exclusive colors La Belle Vie Mauve and La Belle Pink.  The flowers were cut with the new Artiste cartridge using those exclusive colors.  (They're only in the La Belle Vie paper kit, so if you love them too, don't miss out on them!)


Here are the flowers before I did anything to them.  Just twirled up and stuck to their base with a glue dot.  They look alright, but I like my flowers to look a little more realistic.  Well, as realistic as I can get them anyway!


With just a little spritz of stamp cleaner (or water), the paper breaks down just enough to become pliable.  I used my tweezers and fingers to roll down/push down the petals. Then I used a sponge (or dauber) on the edges with the Champagne ink.  Much better, right?!


And the same thing with the leaves.  This is just the basic leaf straight from the Cricut mat.  Pretty flat and boring!


I took my embossing stylis and drew veins on the back of the leaves.  Then I flipped them over and lightly sponged them with the Champagne ink. I also gave them a quick spritz and they rolled up just a bit.

Here is a close up shot of them on the frame:

Pretty, pretty!  Smiley from millan.net

If you're local and would like to come to the Open House, drop me a quick line and I'll get you the information!

Shareaholic

Related Posts Plugin for WordPress, Blogger...