Showing posts with label Stamp Camp. Show all posts

Thursday, May 1, 2014

Light The Way

Happy May Day! From Millan.Net I hope Spring is finally here in your part of the world!  It seems we've bypassed that and gone straight to Summer...with added winds.

I know I've been away for...ever it seems.  I just had other priorities that had to been taken care of first.
But now I think I've got some craftiness back in my life and I'm ready to share!From Millan.Net

Last month I spent a great weekend with friends in Sedona, AZ for our team Stamp Camp.  I chose to work with the new Timberline paper pack and came up with some decidedly masculine cards.  Which, honestly, I've heard people say they have a hard time make them.  Let me tell you, living with just boys...I find all the frilly fru-fru cards harder! From Millan.Net

Here is the first of the set I made:

Stamps: Camping Delights
Inks: Chocolate, Honey, Goldrush
Papers: Timberline paper pack, Kraft, Colonial White cardstock
Accessories: Durables Studs
Tools: Art Philosophy Cricut cartridge

I'll be hosting a class later this month for this card set.  I know May is busy, busy, busy...but you should also take time for some decompression for yourself!
 From Millan.Net
So if you're local and want to join, stay tuned for class info.  If you're not local but would still love to make the cards, I'll have pre-stamped kits for sale up soon.


Saturday, April 12, 2014

Tuesday, November 19, 2013

Christmas Card Binder

This past Stamp Camp, my friend Trish shared her project and I loved it!  She solved the problem of what to do with all those Christmas cards and photo cards you receive every year.  Create a binder for them!

She used the new My Creations Kraft Album and created a beautiful project you can keep those photos and cards safe, and bring some holiday cheer into your home at the same time!

Stamps: Framework Alphabet
Inks: Ruby
Papers: Frosted Reflections kit, Kraft cardstock
Accessories: Ruby Shimmer Tape, Ruby Mini-Medley Assortment, Sparkles
Tools: Art Philosophy Cricut cartridge


I'll be using the Artbooking cartridge to add some Kraft cardstock pages to my binder.  Because I love it so much and thing it is such a fantastic project, I'm offering classes at my home next month.  Emails have been sent out, but if you're not on my class list and would like to attend, give me shout and I'll get you set up!

Now, I just have to wait for the post to be delivered!  From Millan.Net


Thursday, October 3, 2013

Family Accordion Display Workshop


Happy Fall everyone! From Millan.Net 

Are you slowly getting all your holiday décor up around your house?  Save room for one more, my Family Accordion Display!

This month's Creative Class comes from my Holiday Stamp Camp project.  It features the new Huntington paper pack and the Rosewood Mini-Medley Collection.  (My personal favorite from the Idea Book!)  The project measures 5" x 19" and looks great on mantles or tabletops.


Kits include all cut pieces, Rosewood Collection, hemp, and directions for basic assembly.


Class Times
Thursday, October 17  9am-11am
Saturday, October 19  2pm-4pm
Thursday, October 24  9am-11am
                                      7pm-9pm
Saturday, October 26  2pm-4pm
 
Class fee is $20 per kit  or  $15 with a $20 order.
RSVP by October 10 to save your spot!
 
Kits will be mailed to non-local class members for $5 extra.


Kit Options


Saturday, April 13, 2013

Close To My Heart Word Collage

I wanted to share one of the gifts I made for the Stamp Camp gift exchange last month.

I used a 12"x12" canvas I got at Michael's and created a Close To My Heart word collage!


My upline Sue, at LattaStamps, picked this from our stack of prizes.

This was really easy to create.  I first painted the whole thing with Create-A-Shade Pearl Paint, though it is hard to tell in the photo.  Then after designing and cutting the vinyl pieces on my computer, I transferred them to the canvas.  After making sure they were good and stuck, I painted over the whole thing again with the Pearl Paint.  Why?  Because this makes sure to seal the letters down, and any paint that may seep underneath will be the same color as the base coat.  When that was dry, I put my top coat of a black canvas paint...well, on top.  After that dried, then I carefully peeled off all the letters and shapes.  Then I used the gel medium from this project to seal it.

Done and done!  I have more canvases that are just screaming to be decorated as well.  I love this quick and easy project!

Tuesday, October 23, 2012

Heart2Heart Challenge: Halloween or Pumpkin

Smiley from millan.net  This is my boys' favorite time of year...just before Halloween when the antici...pation for Trick or Treating is nearly overwhelming.Smiley from millan.net  And while we don't exactly have falling leaves around here, it is cool enough during the early day to keep all the doors and windows open...and that's a plus with me!

I've been waiting to show this Stamp Camp project properly and with the Heart2Heart Challenge this week being Halloween or Pumpkin themed, it was the perfect time!  And it has been so long since I've been able to join in on the challenges, I've missed them.   What's more, I think I'll be able to complete every challenge this month!  Woohoo for me!

Okay, now back to this week's challenge.  This Halloween project was the project I created for the Holiday Stamp Camp back over Labor Day.  And it was also my Creative Class held last week.  The ladies loved it!  Take a peek:

The top of the My Creations Card Box is decorated with the new Moonlight Complements Dimensional Elements and Olive Twine from the Baker's Twine Harvest Assortment.  I used Liquid Glass to highlight bits of the banner pieces and the cat's eyes and nose.  There is also a touch of Green Glitz Glitter Gel (say that 5 times fast!) on its eyes.  The long banner piece is for writing the name of the recipient of your wonderful Halloween treat!


The front of the box has a couple of cute pumpkins and a spooky ghost from the complements sheets.


And once again, I used Liquid Glass and highlighted the ghost's eyes and mouth as well as the pumpkins' eyes.  Green Glitz for the stems and around the EEK! for a touch of sparkle.


Open up the box and you have a cute little Halloween scene!  Lots of Glitz and Liquid Glass to add sparkle: moon, windows, Frank, the spider.  Even some Silver Glitz on the "cauldron"!


The cupcake wrapper was cut at 1.75" from the Artiste cartridge, found on page 77.  Fill it with a bag of your favorite candy! Smiley from millan.net


A couple of Tombstones to decorate the sides of the box, cut from the Artiste at 2.8 cm in Whisper and Slate cardstock.  I filled in the RIP with Silver Glitz.


Quick and easy to put together...well, aside from all the waiting for everything to dry part!


I hope you enjoyed my little project!  So now are you wondering how I colored the box itself?  Easy, but not necessarily neatly!  I did one box for my display for camp.  This was done with our Spray Pens, Black reinker, water, alcohol, and Create-A-Shade Pearl Paint.  Well, I needed to get several boxes done for camp and our little Spray Pens only hold so much.  I used one of our travel spray bottles and made a big batch of the spray.  It worked fantastically!

Until I realized something important. Smiley from millan.net
So if you attempt to make many boxes at a time as gifts, one word of caution:


Saturday, October 13, 2012

Wishes & Dreams

Smiley from millan.net
It is a wonderfully chilly morning here.  Ah, maybe Fall has come to the desert at last!  I love when I can open up the doors early and hear the day start.

Engineer and Bio-Comp are off to a Scout activity and the other two boys are still in bed.  One last sleep in before school resumes Monday I guess.  So right now I have a quiet house to myself.  The last 3 weeks with the boys home have been wonderful, but I think I'm ready for them to go back to school and be on a schedule again!

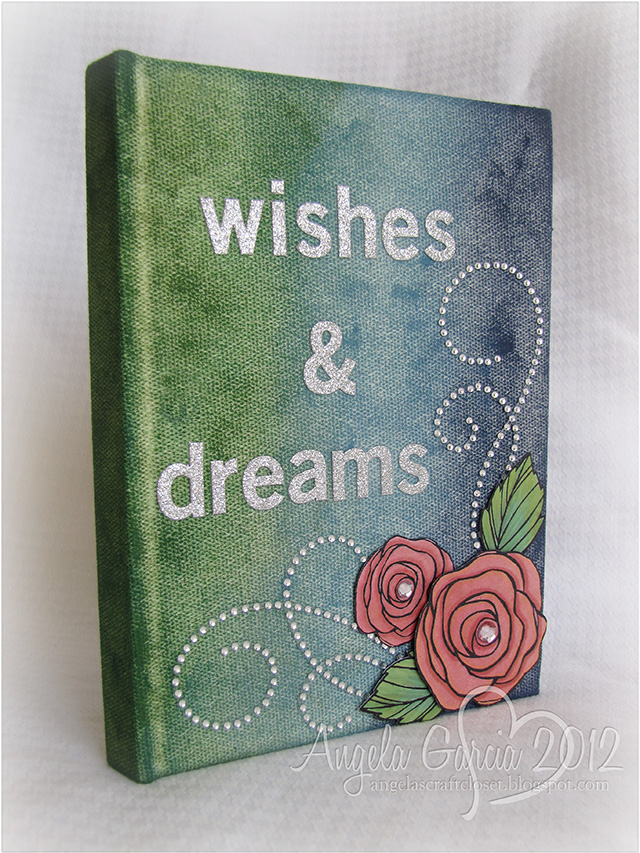
This morning, I'm going to share another Stamp Camp project from a couple of months ago.  Our fearless leader Kim (she'd have to be fearless to let us take over her downstairs for the weekend!) created a project using the new My Creations Canvas Journals.  She used the Flirty paper, Sparkle Flourinshes, Love Blooms stamp set and Canvas Alphabet.  It was a totally adorable project...and I went a completely different direction with mine...as you can see!  Smiley from millan.net


Stamps: Love Blooms
Inks: Ponderosa Pine, Indian Corn Blue, Outdoor Denim pigment inks, Archival Black
Hollyhock, Topiary, Sweet Leaf marker sets
Accessories: My Creations Canvas Journal, Pixie Glitter Alphabet, Sparkles Flourishes, Sparkles
Tools: Liquid Glass,3D foam tape 
 Smiley from millan.net
 
I took the new pigment inks and simply rubbed them all over the canvas until I got the coverage I wanted.  While that dried, and it does take a while for the inks to dry  Smiley from millan.net, like get-out-your-heat-guns-and-zap-it-awhile time for it to dry, I stamped and colored my roses and leaves.  I love the new alcohol markers...I think I've said that once or twice before already...but I truely do!  I even colored the Sparkles in the roses with the markers!
 
So after the journal was mostly dried,  I attached the Sparkle Flourishes.  I did have to use little drops of Liquid Glass here and there to keep it attached to the canvas.  I popped up the leaves and roses with 3D tape and placed them on.  Then I used the Pixie Glitter letters (which I won at Stamp Camp, thank you Kim!) for the title.  That was probably the hardest part of this whole project, coming up with a title!
 
And now I have a beautiful journal waiting for me to fill it up!
 
Let's see...wishes and dreams of a mom with 3 (or 4) boys.  How about: 
help with laundry Smiley from millan.net
shopping Smiley from millan.net
cleaning up Smiley from millan.net 
making dinner Smiley from millan.net
kids not fighting     Smiley from millan.net
and getting to sleep in myself every once in a whileSmiley from millan.net
 
Yeah, I'll let you all know when that happens!
 
 
Have a great weekend everyone!  I'm off to set up tables for an afternoon class of Trick or Treat Boxes!


Wednesday, September 19, 2012

More Table Gifts from Holiday Stamp Camp

I wanted to share the other table gifts that were given out during Stamp Camp.  All these ideas are so cute and easy to make with the new Artiste Cricut cartridge!  Keep your eye out for all the fun things you can make with it!
Smiley from millan.net

First up is this coffin treat box made by Di.  She embossed the skull image from the Triller set!  I love this retired set and hope it makes it's way back into the Idea Book sometime.  And I love the "spooky" cut from the Artiste!

 
Trish was really busy with all her treats!  She found these cute bone candies and put them in test tubes for us...then made these cute holders to match!  I love the Moonlight paper with the Sunset cardstock.  She cut the skull with the Artiste cartridge...just make sure you put it on Real Dial or you'll get a teeny tiny head!

 
She also brought these cracker jack boxes.  Two different kinds even!  First this pumpkin using Flirty paper.  (It did have a leaf and tendrils on it, but alas those did not make it during the trip home.  You'll just have to use your imagination I guess!)
Smiley from millan.net

And this second version usingpaper from Moonlight.  A Cracker Frank box, perhaps?


And one last gift from Trish.  Told you she worked hard!  These cute little gable boxes with our monograms stamped on it!  What's inside?  Chocolate, of course! Smiley from millan.net She used paper from the Avonlea collection and Kraft cardstock to make these.


And this last piece.  While not a table gift exactly, but a wonderful thank you card from Janice!  She roomed with us and gave us all these as a gift.  It even has a Starbuck's gift card inside!  How sweet is that?!? Smiley from millan.net I'll have to try one of their smoothies, or shakes, or pastries...you can tell I've never been to a Starbucks before, right?


Well that should give you a few more ideas for what you can do with the awesome Artiste!  And with Halloween just around the cornerSmiley from millan.net you can get a head start on your crafting!

Have a great week!

Shareaholic

Related Posts Plugin for WordPress, Blogger...