Showing posts with label Tutorial. Show all posts

Monday, April 15, 2013

Heart 2 Heart Challenge: Button, Button...Who's Got The Button?

Koumponophobia...if you suffer from the fear of buttons, this week's challenge from Heart 2 Heart is not for you!From Millan.Net

On the other hand, if you're like me and love to just scoop up handfuls of buttons and let them fall through your fingers...
From Millan.Net
well, get ready for a challenge right up your alley!!


This week the design team at H2H is sharing some pretty awesome artwork using buttons.  Visit the H2H Blog to see the others' creations, but first take a peek at my Love Canvas!


My Creations 6X6 Canvas Display
Accessories: Basic Assortment Buttons, Mini-Medley Accents Antiqued Gold Collection,
Burlap Ribbon, Embroidery Floss Neutral Assortment
Tools: Staple Gun
 
 
Here is a close up shot:


Now if you'd like to see the other DT members' creations, head over to the H2H Blog and enjoy!  If you'd like to stick around and see how I made this, carry on!

 
These are the basic supplies you'll need.  Plus a staple gun and mini glue dots.


Snip off 4 pieces of the Burlap ribbon, as wide as the edge of the canvas.  This will cover the corners when you begin wrapping the canvas.  I used glue dots to hole them down.


Before I started, I did take off the hanger on the back of the canvas.  When you've done that, simply staple the edge of the ribbon to the back, wrap around the front, and staple on the back of the other side of the canvas.

Rotate the canvas and do the same thing with the ribbon going the other way. 


When you're done, your canvas should look like this.


I knew each of the letters would have to be smaller than 3"x3", so I placed my buttons on my VersaMat until I got them the way I liked and the right size.  I used mini glue dots to place them on the canvas, one letter at a time, so they wouldn't move as I stitched them on.  The frame of the canvas is pretty wide, and several of the buttons were above that.  But with the give of the canvas, I could still run my needle and thread through the buttons...it just took a while longer than it normally would have.

Well, I hope you've enjoyed by Button, Button creation!  I can't wait to see what you come up with!

Remember:
1.Use Close To My Heart products. Your project doesn't have to be 100% CTMH, but you must use some. After all, this is a challenge blog created and sponsored by CTMH consultants.
2.Incorporate this week's challenge...BUTTONS!
3.Link your project back to Heart 2 Heart from your blog or online gallery. If you are linking from a blog, you must link directly to the actual post, not your entire blog.
4.You also need to mention Heart 2 Heart (H2H) in your blog post.
5.Finally, we ask that you consider turning off word verification, as it makes it easier for the design team (and others) to leave comments.

Happy Crafting!

Wednesday, April 10, 2013

Photo Canvas Tutorial

Canvas art has become really popular in the crafting/home décor world!  And why not?  With a blank canvas, you can create absolutely anything you'd like!
From Millan.Net

I love the new My Creations 6"x6" Canvas Displays.  I wanted to create something for my home and with all the easy step by step instructions you can find online, I decided to jump right in and make my own!


This was so easy to make, I'm thinking of doing a wall collage of each of my boys.  Let me walk you through the process.
 
These are the supplies you'll need.


I got the canvas gel medium at Michael's in the art department.  (Bring along a coupon!)   And what about your photo?  This tutorial doesn't use an actual photo.  Rather, you'll want to print your photo on plain copy paper.  ***Be sure to use a laser printer!***  If you use an ink jet printer, your photo will run and bleed and give it a really watercolor, artsy-fartsy look.  Ask me how I know that. From Millan.Net
 
So I didn't actually take photos while I was making it, simply because after the, ahem, ink jet incident I wasn't too sure how this would turn out!  But I'll give you step by step details, and if anyone needs it, I'd be happy to make another one and take photos of that!
  1. I sized my photo in Photoshop and made it black and white.  I also mirrored it so it would come out the right way when it was done.  (Then I had to email it to Engineer to print at work on their laser printers!)  I made the photo just under 6"x6", but when I trimmed the paper I gave myself a big enough border around the photo to handle it when it came time to place it on the canvas.
  2. Take your gel medium and foam brush and give the canvas a good coat.  Not too thick, but enough to see it.
  3. Take the paper with the photo and spritz it with water.  Really.  Don't soak it, but get it nice and wet.  (This is why you need to use a laser printer!)
  4. Making sure the canvas is in the right direction, lay the paper photo side down onto your canvas.  Yes, onto the wet gel medium.
  5. Smooth out any bubbles.  Use a credit card, fingers, or I used my stoneware scrappers from Pampered Chef!  Just be sure you don't tear the paper.  I also flipped mine over and smoothed a bit from the back side.
  6. Now...wait.  I'm not a patient crafter, so placed mine under the ceiling fan in the family room and turned it on high. From Millan.Net
  7. It should be good and dry now, right?  Well when it is, take your spray bottle and soak it. You heard me right...get it good and wet!  Like water-running-off-making-puddles wet! From Millan.Net
  8. When you have it soaked to the bones, then it's time to gently peel the paper off.  The photo stays on the paper...how cool is that?!?
  9. Once you get the paper peeled, the tedious part starts.  Being ever so gentle, start rubbing the paper fibers off the photo.  Use a circular motion with little pressure.  Too much pressure and you'll rub the photo off.  As the canvas dries, you'll be able to see the fibers better.  Just spray again and work in sections until you have them all off.  Be extra careful around faces and details you want to keep.  (I did rub a little harder in some spots to take the photo off on purpose, just to give it an aged look.)
  10. When you have it done to your liking, let it dry.  Again. From Millan.Net
  11. Cover the entire canvas with the gel medium to seal it and let it dry.  And you're done!!
 Here is a close up of the canvas:
 
 
The gel leaves brush strokes, like a finished canvas.
 
I hope you'll share with me any canvas photos you make!  If anything wasn't clear in the directions, just let me know and I'll whip up another post with photos! 


Tuesday, October 2, 2012

Very Merry Christmas Ornament Tutorial: Part 2

Alright, who's ready to finish off their ornament from Part 1Smiley from millan.netThen let's get started!


This is what we've finished so far.
Just set this aside for now and we'll create the center embellishments.


1.  Take the two 12" strips of cardstock and begin accordian folding them both.


2.  You should end up with nice, tight accordians.


3.  Take your favorite adhesive and attach one end of the White Daisy strip to the other,
overlapping the edges, to create a ring.


4.  Gather one edge of the ring towards the center and push down, creating a rosette.
Take the 2" White Daisy circle and cover it with Liquid Glass.
Attach this to the center of the rosette.
(It doesn't have to be exactly centered.  This just makes a base for the rosette to attach to.)


5.  Use a block or some other object to set on top of the rosette as it dries.


6.  When it has dried, use the Silver Glitz Glitter Gel to edge the rosette.  Let it dry.


7.  Take the Twilight strip and repeat steps 3 & 4, except instead of attaching it to a circle base,
place Liquid Glass on the White Daisy rosette and place the Twilight rosette on top, fitting it in the folds, as shown in the photo.  Place theblock on top and let dry.


8.  Add more Silver Glitz to the edge of the Twilight rosette.


9. Did you know you can color embroidery floss with our alcohol markers?  Take a long string of floss, 7"-10" (whatever your fingers will be comfortable tying in a bow) and color with the Twilight marker.  Use the blending marker to smooth out the color if you wish.


10.  I forgot to take step by step photos of this next embellishment...sorry.
  • Stamp the "A Holiday Treat" image from the stamp set onto the Shift/Accent 4 White Daisy cut out.
  • Edge the 1" White Daisy circle with Silver Glitz.  Attach to stamped image with 3-D foam tape.
  • Add Sparkles to the stamped image as shown.
  • Thread the Twilight floss through a large Bling button and attach to the circle with a Glue Dot.


11.  Now you should have all 3 main pieces as shown.


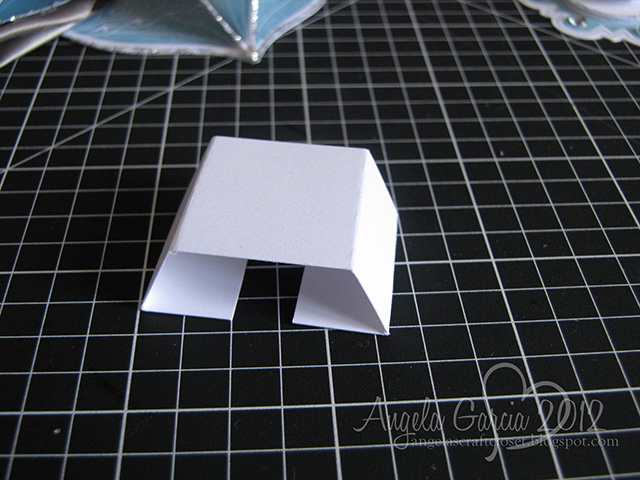
12.  Take the 1" x 3" White Daisy piece and fold along the score lines.


13.  This creates a base for the rosette to attach to.


14.  Use Liquid Glass to attach it to the center of the ornament base.


15.  Use Liquid Glass to attach the rosette to the ornament base.


16. Use Liquid Glass to attach the center embellishment to the rosette.
Now your ornament is complete!


17.  For the hanger, take the 16" ribbon piece and, using Glue Dots, fold over the ends as shown.


18.  Flip the ornament over.  Note where the top of it is before you attach the ribbon.


19.  Attach the ends of the ribbon with Glue Dots.


20.  Cover the back with Liquid Glass and the remaining 3" circle.


21. Flip it right side up again.  Make sure your ribbon is nice and flat.


22.  With White Daisy embroidery floss, thread a small Bling Button and tie around the ribbon hanger, just above the ornament.
 
There!  You're finished! Smiley from millan.net


Engineer had a good idea.  He wanted me to make two and attach them back to back.  And I may do this, just for fun...but after I've had a nap!
Smiley from millan.net

If you create one of these for yourself, please let me know! I'd love to see it!


Very Merry Christmas Ornament Tutorial: Part 1

Smiley from millan.net  Thank you everyone for all the nice comments you left me on the Blog Hop post and FaceBook!  It really means a lot to me!  I spent yesterday editing photos for the tutorial so you can make one for your very own.

It's not hard to put together, just a lot of steps.  So I've broken it up into 2 parts.  This post will show you how to make the base of the ornament, the next one will show you how to make the center embellishment and hanger.  And by all means, make it your own!  If you'd like to change something from what I've done, please do!  But I'd love to see what you created when you're done.  
Ready to get started?  Smiley from millan.net

Supply/Tool ListSmiley from millan.net
  • White Daisy cardstock
  • Twilight cardstock
  • Twilight ink
  • Very Merry Christmas stamp set
  • Silver Glitz Glitter Gel
  • Twilight Marker
  • Alcohol Blending Marker
  • Slate Satin Polka-Dot Ribbon
  • Bling Assortment buttons
  • Sparkles
  • White Daisy Embroidery Floss
  • Liquid Glass
  • Glue Dots & Mini Glue Dots
  • Artiste Cricut cartridge
  • Scoring Stylus
  • Paper Piercer
  • Blocks
  • Scrubber/Spritz


Cutting Your Pieces  Smiley from millan.net
(though I recommend a Cricut and paper trimmer over the chainsaw)
  1. Cut 20 ornament images at 3" (pg. 79 in the Artiste booklet) in White Daisy cardstock.  (One of the great things about our stamp sets that coordinate with our Cricut cartridges is the measurements for the images are right on the stamp sheet. No need to measure or guess what size to cut your image!)
  2. Cut 20 complimentary ornament images at 2½" in Twilight cardstock. (I used the ornament on pg. 47 of the Art Philosophy cartridge.  But any of the ornaments on pg. 53 of the Artiste handbook would work as well.  Just a matter of preference!)
  3. Cut two 3" circles, a 2" circle, and a 1" circle in White Daisy cardstock. (pg. 48 in the Artiste booklet).
  4. Cut the  Shift/Accent 4 image (pg. 79 in the Artiste booklet) at 1 ¾" in White Daisy cardstock.
  5. Cut a 1½" x 12" strip of White Daisy cardstock.  Score this at every ¼".
  6. Cut a 1" x 12" strip of Twilight cardstock.  Score this at every ¼". 
  7. Cut a 1" x 3" piece of White Daisy cardstock.  Score this at  ½", 1", 2", and 2½".
  8. Cut five 5¾" pieces of the Slate Satin Ribbon.
  9. Cut a 16" piece of the Sate Satin Ribbon.


Putting It TogetherSmiley from millan.net


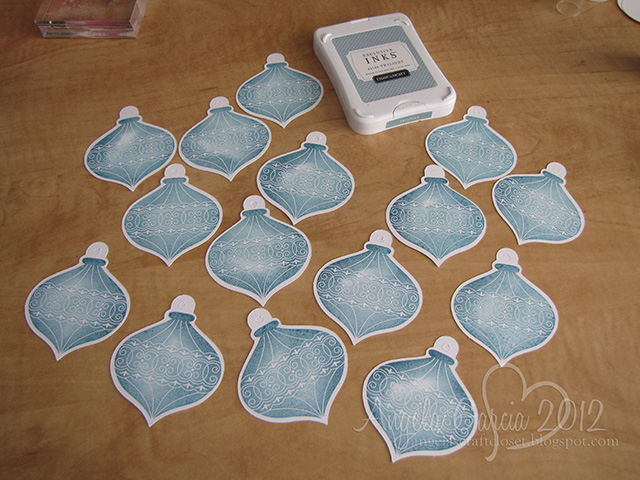
1. Stamp the ornament image onto 15 of the White Daisy cut outs.  Score down the middle.


2. Score 15 of the Twilight ornaments down the middle.


3. Take one of the scored ornaments and apply Liquid Glass to one side.


4.  Attach another ornament piece, then apply Liquid Glass to it's other half. 


5.  Attach a 3rd ornament, then apply Liquid Glass over the whole back.


6. Attach an unscored ornament piece to the back of the whole thing, creating a base.
Repeat steps 3-6 until you have 5 sets put together.


7. Do the same thing with the Twilight ornament pieces.


8.  When you've finished, you should have 10 3-D ornament pieces.


9.  Take the Silver Glitz Glitter Get and apply it to every edge.
(These photos show Glitz only on the raised edges, but I did go back over the outer edges with the Glitz.)


10.  Take one of the 3" White Daisy circles and attach the tops of the ornament pieces to it with Liquid Glass.  Set this aside for now.


11.  Take the 5 strips of ribbon and Mini Glue Dots.  Place one glue dot at the edge of the ribbon, centered along the long side.  You can almost see where it is in the photo.


12.  Pinch the two center edges together as shown in the photo.  Use your piecer to place another glue dot where indicated by the arrow.


13.  Rotate the ribbon and press down, creating a point on the ribbon.  Place another glue dot where indicated by the arrow.


14.  Flip the ribbon over and create another point on the ribbon.


15.  Do this with all 5 ribbon strips.


16.  Take the ornament base and add the ribbon points between each stamped ornament with Liquid Glass or regular Glue Dots.


17.  Add Glue Dots to the back of the Twilight ornaments (or use Liquid Glass) and attach to the center of the ribbon points.


Now you've completed the base of the ornament.  That wasn't so hard, was it? Smiley from millan.net

Stay tuned for Part 2!
Smiley from millan.net

Shareaholic

Related Posts Plugin for WordPress, Blogger...