
 Thank you everyone for all the nice comments you left me on the Blog Hop post and FaceBook! It really means a lot to me! I spent yesterday editing photos for the tutorial so you can make one for your very own.
It's not hard to put together, just a lot of steps. So I've broken it up into 2 parts. This post will show you how to make the base of the ornament, the next one will show you how to make the center embellishment and hanger. And by all means, make it your own! If you'd like to change something from what I've done, please do! But I'd love to see what you created when you're done.
Ready to get started? 


Supply/Tool List
- White Daisy cardstock
- Twilight cardstock
- Twilight ink
- Very Merry Christmas stamp set
- Silver Glitz Glitter Gel
- Twilight Marker
- Alcohol Blending Marker
- Slate Satin Polka-Dot Ribbon
- Bling Assortment buttons
- Sparkles
- White Daisy Embroidery Floss
- Liquid Glass
- Glue Dots & Mini Glue Dots
- Artiste Cricut cartridge
- Scoring Stylus
- Paper Piercer
- Blocks
- Scrubber/Spritz
Cutting Your Pieces 
(though I recommend a Cricut and paper trimmer over the chainsaw)
(though I recommend a Cricut and paper trimmer over the chainsaw)
- Cut 20 ornament images at 3" (pg. 79 in the Artiste booklet) in White Daisy cardstock. (One of the great things about our stamp sets that coordinate with our Cricut cartridges is the measurements for the images are right on the stamp sheet. No need to measure or guess what size to cut your image!)
- Cut 20 complimentary ornament images at 2½" in Twilight cardstock. (I used the ornament on pg. 47 of the Art Philosophy cartridge. But any of the ornaments on pg. 53 of the Artiste handbook would work as well. Just a matter of preference!)
- Cut two 3" circles, a 2" circle, and a 1" circle in White Daisy cardstock. (pg. 48 in the Artiste booklet).
- Cut the
Shift/Accent 4 image (pg. 79 in the Artiste booklet) at 1 ¾" in White Daisy cardstock. - Cut a 1½" x 12" strip of White Daisy cardstock. Score this at every ¼".
- Cut a 1" x 12" strip of Twilight cardstock. Score this at every ¼".
- Cut a 1" x 3" piece of White Daisy cardstock. Score this at ½", 1", 2", and 2½".
- Cut five 5¾" pieces of the Slate Satin Ribbon.
- Cut a 16" piece of the Sate Satin Ribbon.
Putting It Together
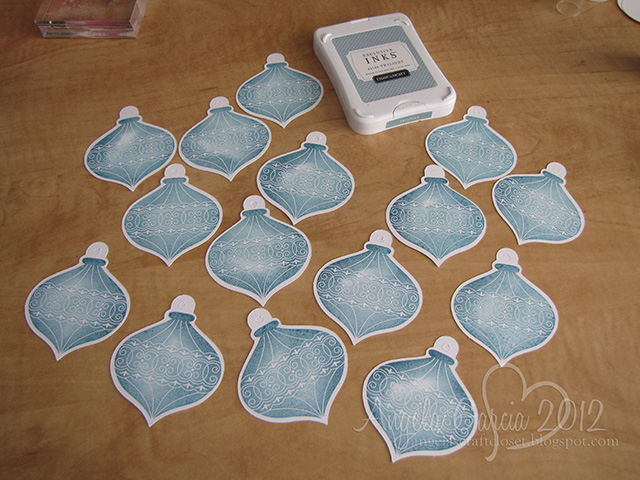
1. Stamp the ornament image onto 15 of the White Daisy cut outs. Score down the middle.

2. Score 15 of the Twilight ornaments down the middle.

3. Take one of the scored ornaments and apply Liquid Glass to one side.

4. Attach another ornament piece, then apply Liquid Glass to it's other half.

5. Attach a 3rd ornament, then apply Liquid Glass over the whole back.

6. Attach an unscored ornament piece to the back of the whole thing, creating a base.
Repeat steps 3-6 until you have 5 sets put together.

7. Do the same thing with the Twilight ornament pieces.

8. When you've finished, you should have 10 3-D ornament pieces.

9. Take the Silver Glitz Glitter Get and apply it to every edge.
(These photos show Glitz only on the raised edges, but I did go back over the outer edges with the Glitz.)

10. Take one of the 3" White Daisy circles and attach the tops of the ornament pieces to it with Liquid Glass. Set this aside for now.

11. Take the 5 strips of ribbon and Mini Glue Dots. Place one glue dot at the edge of the ribbon, centered along the long side. You can almost see where it is in the photo.

12. Pinch the two center edges together as shown in the photo. Use your piecer to place another glue dot where indicated by the arrow.

13. Rotate the ribbon and press down, creating a point on the ribbon. Place another glue dot where indicated by the arrow.

14. Flip the ribbon over and create another point on the ribbon.

15. Do this with all 5 ribbon strips.

16. Take the ornament base and add the ribbon points between each stamped ornament with Liquid Glass or regular Glue Dots.

17. Add Glue Dots to the back of the Twilight ornaments (or use Liquid Glass) and attach to the center of the ribbon points.
Now you've completed the base of the ornament. That wasn't so hard, was it? 
Stay tuned for Part 2!
Stay tuned for Part 2!


Thank you for this! I really love your ornament!!
ReplyDeleteOh, I can't wait to try one! =) Thank you for the great tutorial.
ReplyDeleteThank you very much for doing this - it's a beautiful ornament and it looks like something I can put together in time for this year's holidays since I missed last year!
ReplyDelete